










Image-Enhancer.ai Review – How to Fix Blurry Scanned Notes/Assignment Photos Without Photoshop
Blurry scans and out-of-focus photos of handwritten notes are a common problem, especially when you are close to a deadline. In such a situation the first thought many people have is to open Photoshop and fix it there. However, Photoshop is built for detailed, manual photo editing, not a quick one-time fix on a single scanned page.
Image Enhancer AI solves this same problem in a browser, without layers, filters, or manual settings. This review covers it whole to understand it from working to cost and most importantly whether it is the right choice for fixing a blurry scan or assignment photo.
Why Your Scanned Notes Come Out Blurry in the First Place
A few common causes lead to blurry scans and assignment photos:
- Camera shake: A slight hand movement while taking the photo softens the entire image.
- Missed focus: The camera locks focus on the wrong point, leaving the text out of focus.
- Poor lighting: Low light forces a slower shutter speed, which increases blur.
- Low resolution: An older phone camera or a low-quality scanner captures fewer pixels than the text needs to stay sharp.
- Compression: Sending the photo through a messaging app or email often reduces its file size, which softens fine detail like small text.
Knowing the reason does not actually fix the photo, but it explains why a simple crop or zoom will not help. The image needs to be reconstructed, not just resized.
The Photoshop Route (And Why Most Students Skip It)
Photoshop can technically help you sharpen a blurry photo but the process to do it involves multiple manual steps, for example:
- duplicating the image layer
- converting it to a smart object
- then applying a filter like Smart Sharpen or Unsharp Mask and adjusting settings such as Amount, Radius, and Threshold by hand.
Getting this wrong oversharpens the image and makes it look worse, not clearer.
For a single scanned page needed before a deadline, this is a not a right effort to do. It also assumes the user already owns Photoshop and knows how to use it, which rules it out for most students.
image-enhancer.ai Review: Features and How It Works
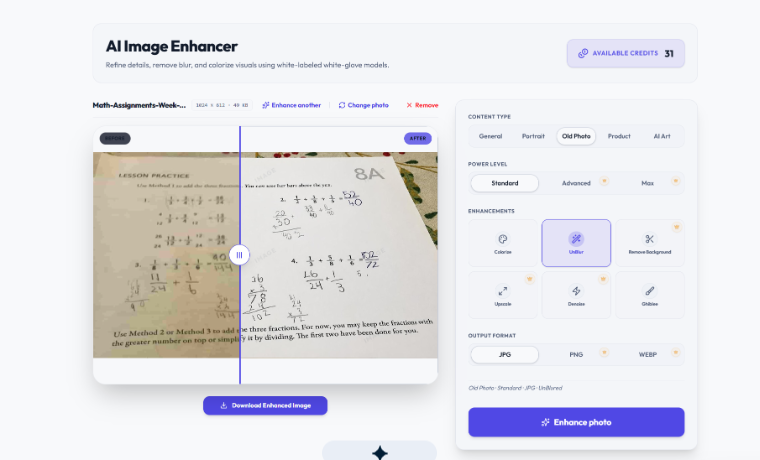
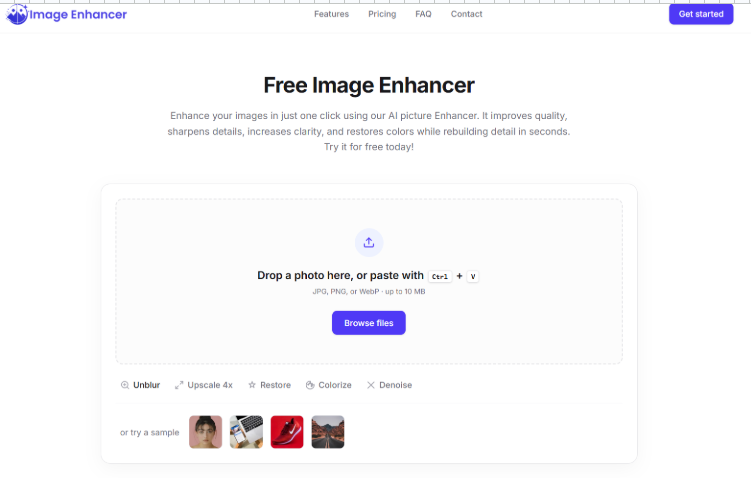
image-enhancer.ai is a browser-based AI photo enhancement tool. You do not have to install anything to use it. It’s very simple to use and the interface is built around a single upload screen rather than a full editing suite.
Getting Started
The homepage leads straight to a drag-and-drop upload area. There’s no multi-step setup before reaching it, a photo can be dropped in immediately, or selected through a file browser, with support for up to 30 images at once.
Content Type: Matching the Fix to the Photo
Before processing, the tool asks for a content type and you can select any from the following:
- General
- Portrait
- Old Photo
- Product
- AI Art
By selecting one of the content types you tell the AI about your specific type of uploaded image so that it could provide the most enhanced results. For a scanned note or assignment photo, General is the right choice. However if the original document is old or faded, selecting the Old Photo as content type applies stronger restoration.
Power Level – How Much Correction Gets Applied
It provides you with another setting which is power level. It controls the strength of the correction in the following levels:
- Standard
- Advanced
- Max
Standard is available on the free plan and handles mild to moderate blur. Advanced and Max apply deeper reconstruction and are reserved for premium accounts, which matters for photos with heavier blur or damage.
Enhancement Tools
Below these two settings sits a grid of specific tools i.e:
- Colorize
- UnBlur
- Remove Background
- Upscale
- Denoise
- Ghiblee
If your uploaded image is blurry, using an UnBlur is the relevant tool and to make the results more accurate you can also add Denoise which will remove grains. The remaining tools serve different purposes entirely as Remove Background and Upscale suit product photography. Colorize feature applies to old black-and-white images.
Output Formats
Once processing is finished, you can download the result in JPG, PNG, or WEBP. JPG is available on every plan however PNG and WEBP are limited to premium accounts.
Batch Processing
For anyone dealing with more than one page, it also provides you with batch processing which handles up to 30 images in a single upload. This turns an entire set of scanned notes into one pass instead of repeating the same steps file by file.
Step-by-Step: Turning a Blurry Scan into a Readable One
- Open image-enhancer.ai and upload the blurry scan or photo.
- Select General as the content type, or Old Photo if the original document is aged or faded.
- Choose a power level. Standard works for mild blur; Advanced or Max handle more severe cases but require a premium account.
- Turn on UnBlur, and add Denoise if the image has visible grain.
- Run the enhancement and review the result against the original.
- Download the corrected image in JPG, PNG, or WEBP.
For a batch of multiple pages, the same steps apply to all uploaded images at once instead of repeating them individually.
Pricing and Value
image-enhancer.ai offers a free plan with three enhancements included at signup, using the Standard power level and JPG output. This is enough to test the tool on a single blurry scan before deciding whether to pay for more.
The premium plan costs $18.99 per month and unlocks Advanced and Max power levels, every enhancement in the grid, PNG and WEBP output, and batch upload for up to 30 images. They also provide yearly billing with a discount by 15%. A separate business plan is available for accounts that need higher volume.
For someone fixing one or two scans occasionally, the free plan likely covers the need without any cost. For a student regularly scanning lecture notes, handouts, or a full set of assignment pages they also provide a basic plan for $8.99.
Pros and Cons
Pros
- No installation or design skill required
- Enhance, UnBlur and Denoise target the exact problem scanned notes usually have
- Batch upload handles multiple pages in one pass
- Free plan is enough to test results before paying
- Content type selection applies the right kind of correction instead of a generic filter
Cons
- Deeper correction (Advanced and Max power levels) sits behind the premium plan
- PNG and WEBP export require a premium account
- Results still depend on how blurry the original photo is, extremely distorted images won’t fully recover
Final Verdict: Who Should Use This, and Who Shouldn’t
image-enhancer.ai is a good fit for students, teachers, or anyone who needs to fix a blurry scan or assignment photo quickly, without learning photo editing software. The free plan is enough for occasional use, and the premium plan makes sense for anyone scanning documents regularly or in batches.
It’s not the right tool for someone who needs frame-by-frame manual control over sharpening, since that level of precision still belongs to software like Photoshop. But for the specific problem in this review, a blurry scan that needs to be readable again, fast, does the job without the learning curve.