


Step-by-Step Method to Perform Office 365 Incremental Migration
In this article we will be going through the process of setting up an incremental migration from a local Exchange Server to Office 365. The process involves the incremental migration of data while still using the data to ensure no duplicates and no loss of data. We will discuss on how we can have a safe and efficient migration using the native tools while also having a look at what third-party tools can offer for a faster and seamless migration experience.
What is Incremental migration?
Incremental (delta) migration is a data migration method in which only the new or modified items are migrated, once the first full transfer of data. This makes the migration safer and reduces the risk of duplicated data on the destination. This is ideal when you have a large number of mailboxes which you would like to migrate from your local Exchange Server to Office 365. In this article, we will see how to perform the incremental migration from Exchange Server to Office 365.
How to Perform Office 365 Incremental (Delta) Migration?
Let’s see how the Incremental (delta) migration works and the steps involved.
Step 1: Initial Seeding
This is the initial step where the selected mailboxes will seed a snapshot of the mailbox, shared mailbox, or archive to the cloud.
Step 2: Creation of Incremental Log
After the first seeding is completed, the tool will create a log that holds all the information of what was migrated to the cloud. This includes information, such as timestamps, message ID, location, and other information related to the item.
Step 3: Delta Synchronization
After the seeding and creation of logs are completed, it will subsequently run the process to compare the source mailbox with the logs to identify any new emails, modified emails, calendar entries, contacts, tasks, and other items of the mailbox.
Step 4: Transfer the Changes
This is where the Incremental (delta) migration happens. This is not done once, but repeated until the company or administrator decides on a cut-off date.
Benefits of Incremental (Delta) Migration
There are a number of benefits of using the incremental migration for migrating data from Exchange Server to Office 365, such as:
- This method saves time and bandwidth when migrating data, since it only transfers the changes. This will reduce the use of bandwidth, facilitate faster migration, and put less performance stress on the source Exchange Server.
- It’s an accurate method to ensure that no new emails or updates on folders or items will be missed or duplicated.
- Users will continue to work and not be impacted at any step of the migration.
- It’s an ideal solution for large organizations.
Can I Perform Incremental Migration via the Hybrid Migration Method?
Although the hybrid migration model offers synchronization between local Exchange Server and Office 365, it is still not truly an incremental delta migration. The hybrid model supports the option to execute a move request from local server to Office 365 while the user continues to use the mailbox and keeps it synchronized but it isn’t pure delta synchronization. Before using hybrid model, you should consider the following:
- The synchronization is continuous and seamless for the user but it doesn’t offer log-based delta migration.
- It is not a synchronization, but an actual move of the mailbox. If there is an issue, you would not be able to compare the source with the destination.
- Although you will be able to resume the synchronization, it’s still not the same as delta migration.
- The setup would need a number of configurations and can get a little complex. There are several points of failures which could result in an administrative burden and delay in the migration project, if not configured accurately.
Incremental Migration via Third-Party Exchange Migration Tools
As you have seen above, the native methods do not fully feature incremental (delta) migration, lack the tracking of new/modified items, and there is no control on duplicate entries. To simplify the migration, you should look at third-party Exchange migration tool, such as Stellar Migrator for Exchange, which truly support incremental (delta) migration. The tool makes the Exchange Server to Office 365 migration simple and much less complex. Let’s see how it works.
Step 1 – Download and Install the Application
Once you have registered through the website, download the software. After the download is complete, run the executable and follow the instructions to complete the installation.
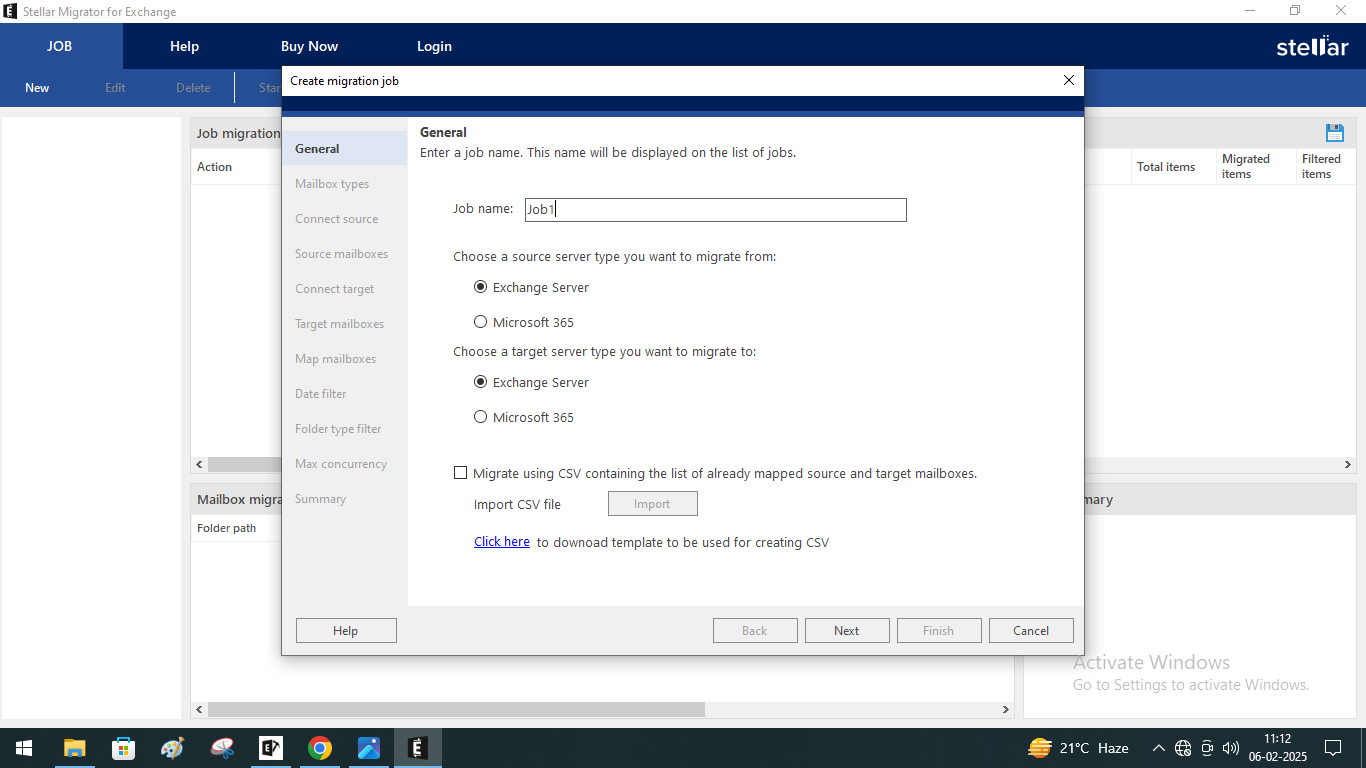
Step 2 – Creation of the Migration Job
Once the software is installed, open it and proceed with the creation of job, which will ask for the name, source, and destination.
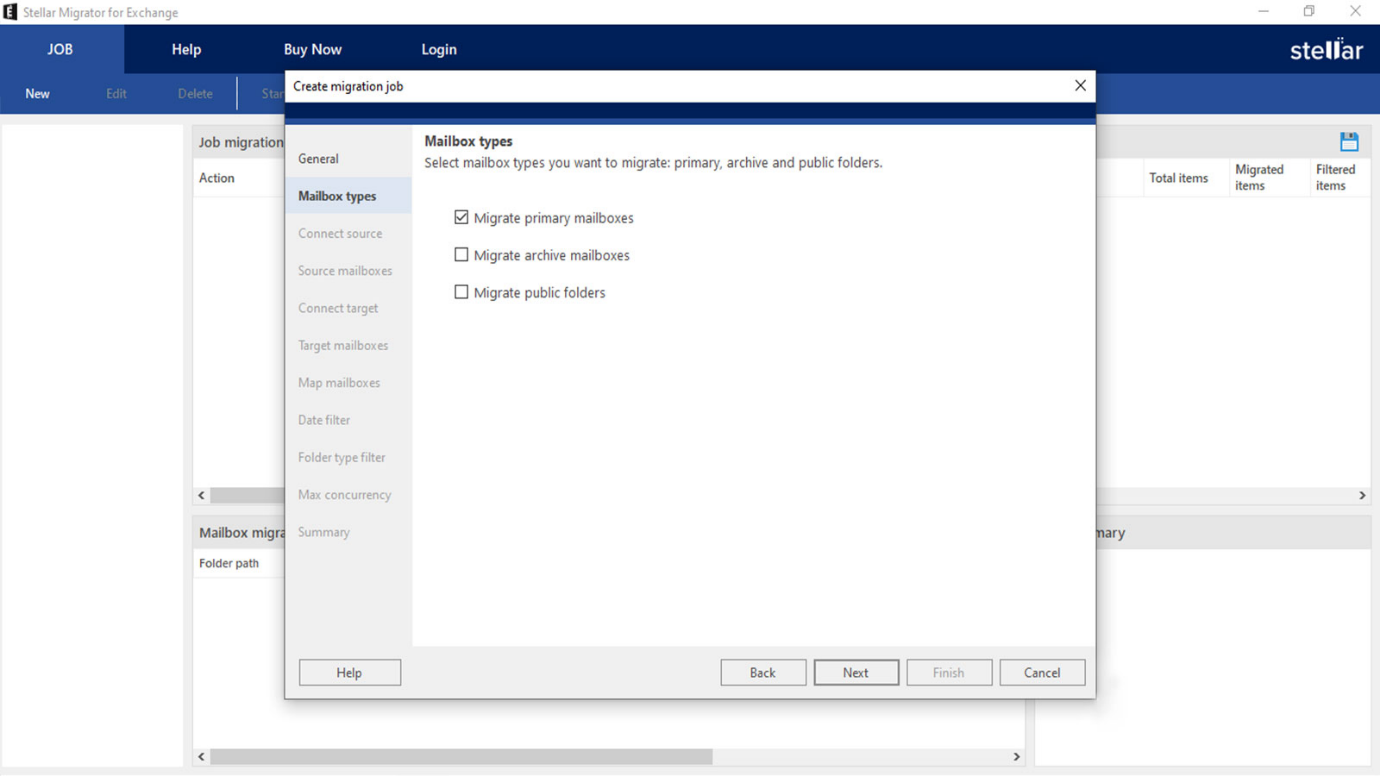
Step 3 – Select the Type of Data
On the next screen you need to select the type of data to migrate, such as primary mailboxes, archive mailboxes, or public folders separately or together.
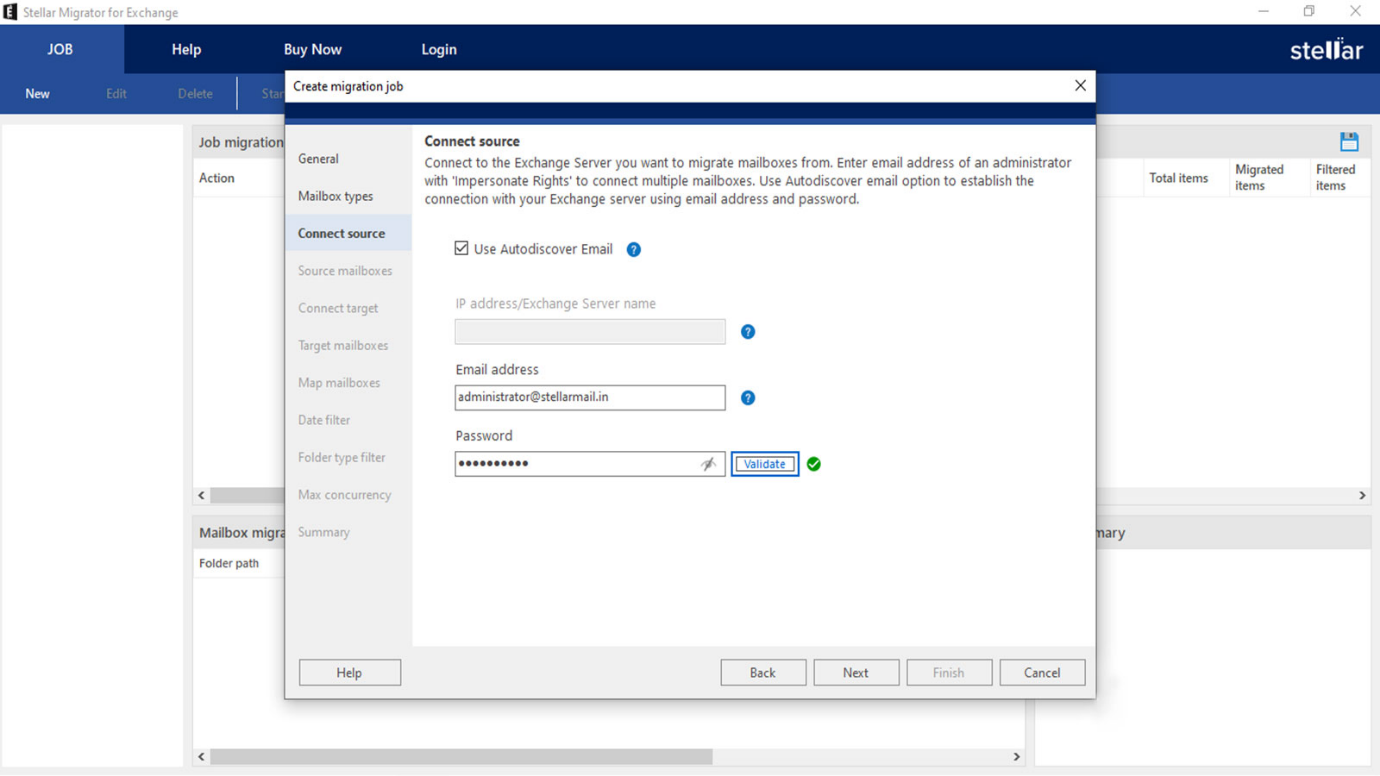
Step 4 – Connect to the Source
Here is where you connect to the source Exchange Server and select the mailboxes or public folders to migrate. You can select from the list provided (up to 100 resources). If you need to select more, then upload the CSV file using the Load Mailboxes using CSV option.
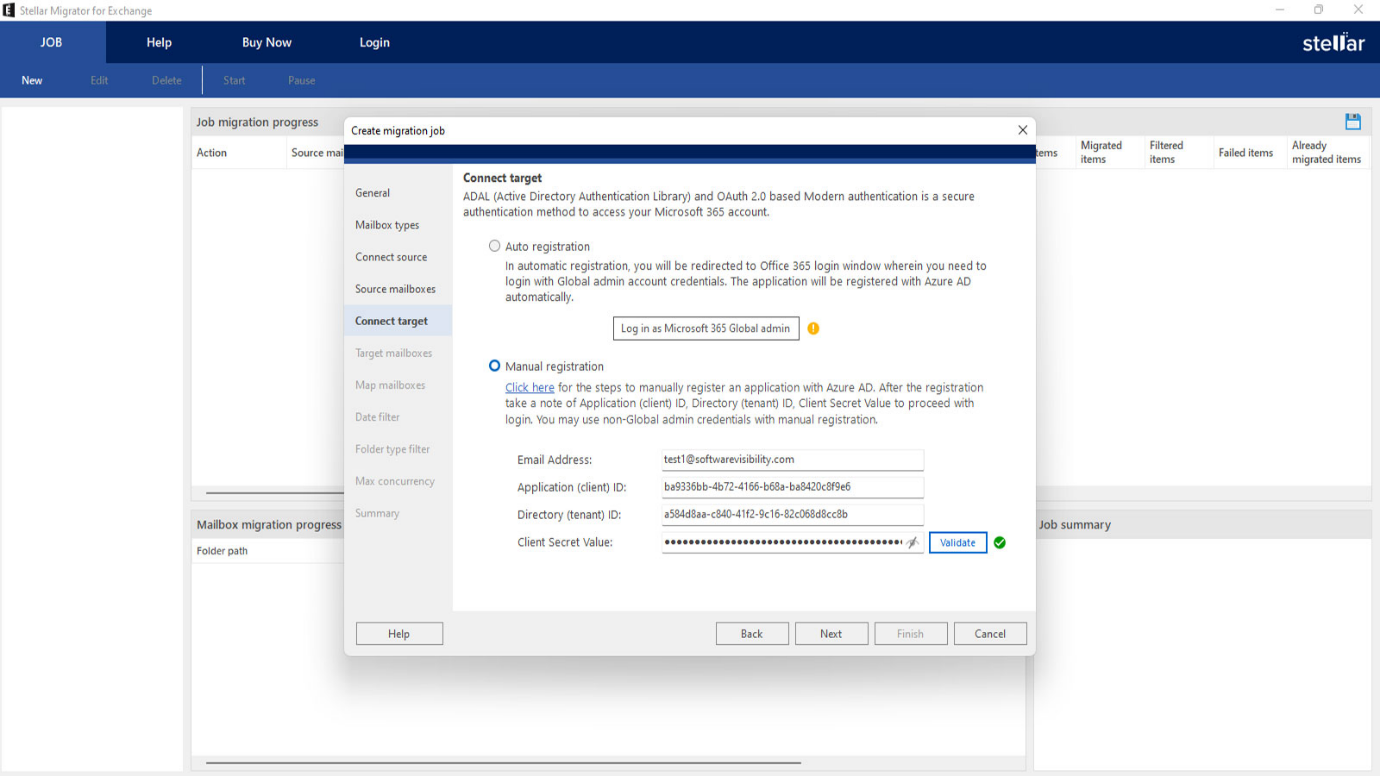
Step 5 – Connect to the Destination
Next, you need to connect to the Office 365 tenant with the username and password of the Global Administrator and select the target mailboxes. The application features automatic mailbox matching from the source to the destination. You can also change the mapping.
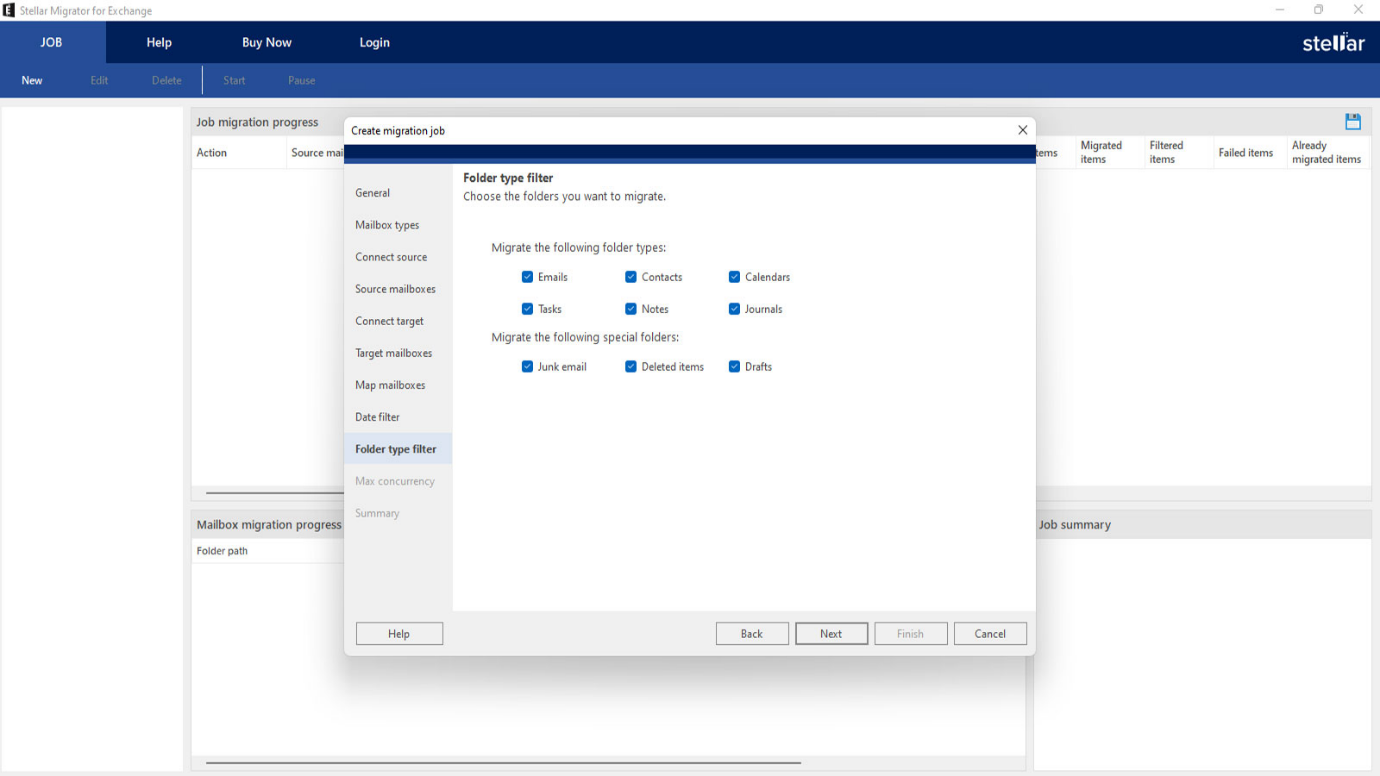
Step 6 – Filtering Option
You can also filter the data based on date or date range and folder types to include/exclude items such as Emails, Calendar, Tasks, Junk Email, and, Deleted Items.
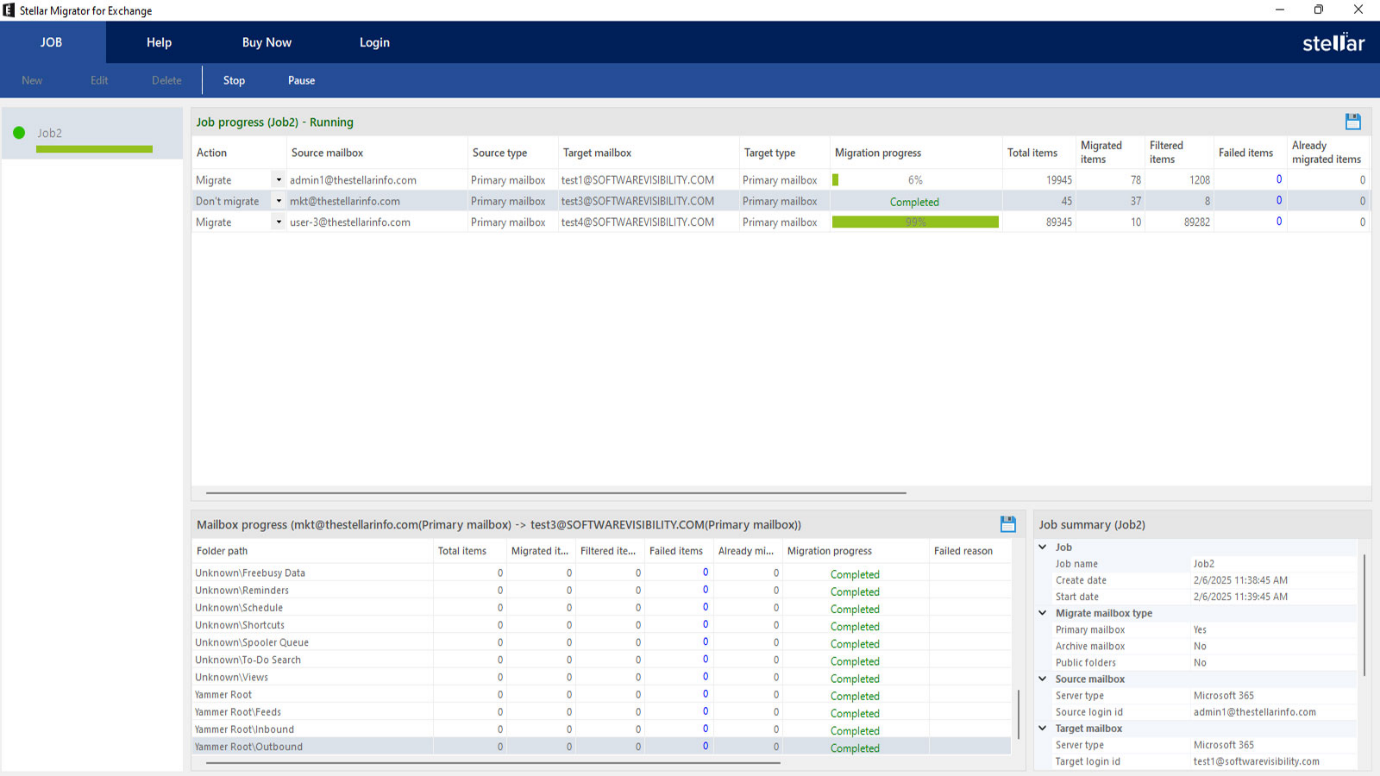
Step 7 – Initiate the Migration Job
Now, you can select the concurrency of migration. You can select up to 10 mailboxes, depending on the bandwidth and network capabilities. Once this is complete, you can proceed to the summary of the job and initiate the migration job. Once the job is started, you can pause it at any time. After the steps are completed, you will have a full progress report and real-time tracking on the migration.
Conclusion
Above, we have explained what Incremental (delta) migration is and what it offers with respect to accuracy and performance. It’s very important to have a peace of mind on the data migration. With the right tools and migration method for the data, you can focus on the security and data governance of the system. So, choose a reliable Exchange migration tool, like Stellar Migrator for Exchange that can migrate data from local server to Office 365 with complete data integrity and accuracy.